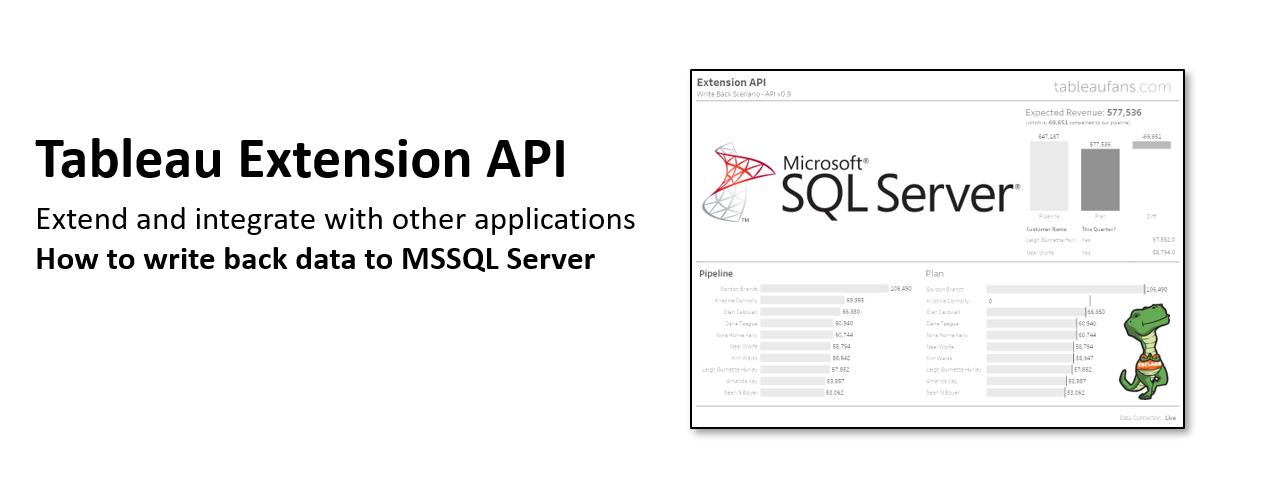
Blog

05
FEB
2019

How to write back data to Microsoft SQL Server?

Tags : Extension API, Extract API, Write Back
Kommentare : 10

Preface

This document assumes you have fully installed XAMPP, MySQL and Tableau Extensions per this blog: https://tableaufans.com/extension-api/tableau-extension-api-write-back-updated-source-code-for-tableau-2018-2/


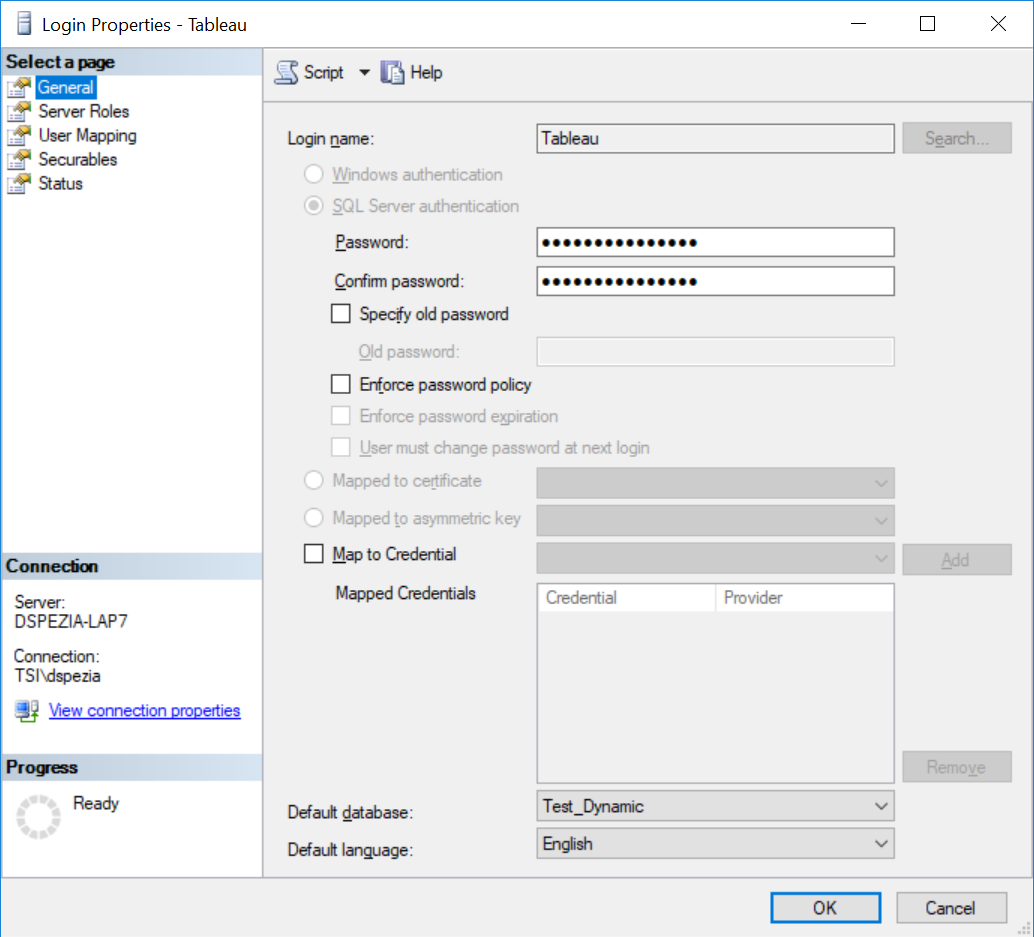
Step 1: Create a New SQL Server User

Log in to the SQL Server you want to setup for write back with SSMS.  Create a new User called ‘Tableau’ with the Password ‘Tableau’.

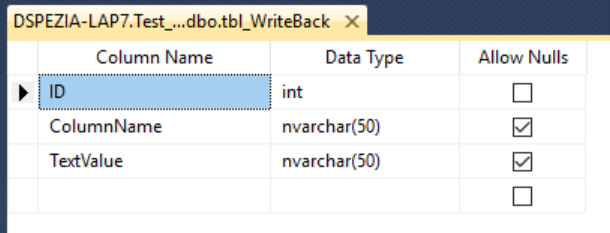
Step 2:  Add Write Back Table to SQL Server

While still in SSMS, add a Table for writing back to called ‘tbl_WriteBack’ to a database of your choice.  I used a database named ‘Test_Dynamic’ for my purposes.  The table as am [ID] integer with an identity and serial increase and 2 nvarchar(50) for [ColumnName] and [TextValue].

Step 3:  Give the Tableau User CRUD Permissions to the tbl_WriteBack

Use SSMS to update the permissions for the ‘Tableau’ user to be able to CRUD the new table created in Step 4.

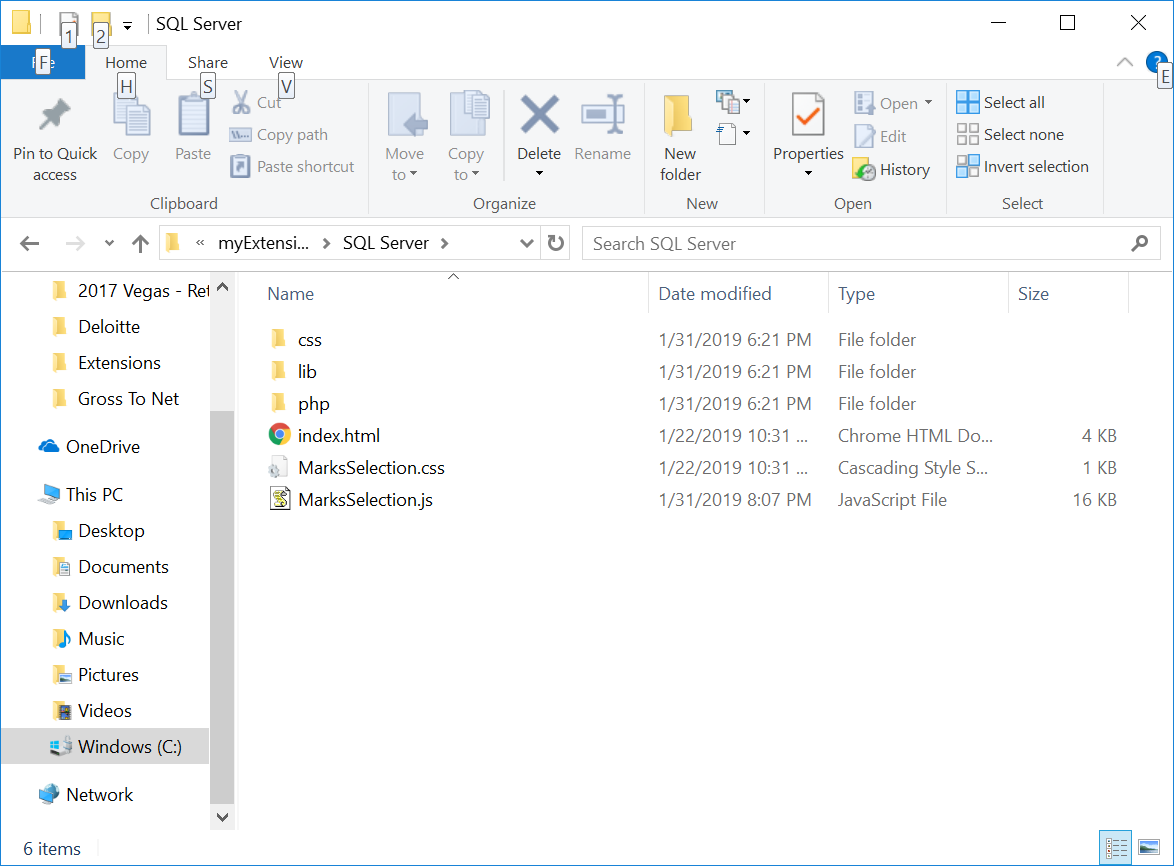
Step 4: Duplicate the MySQL Writeback Code

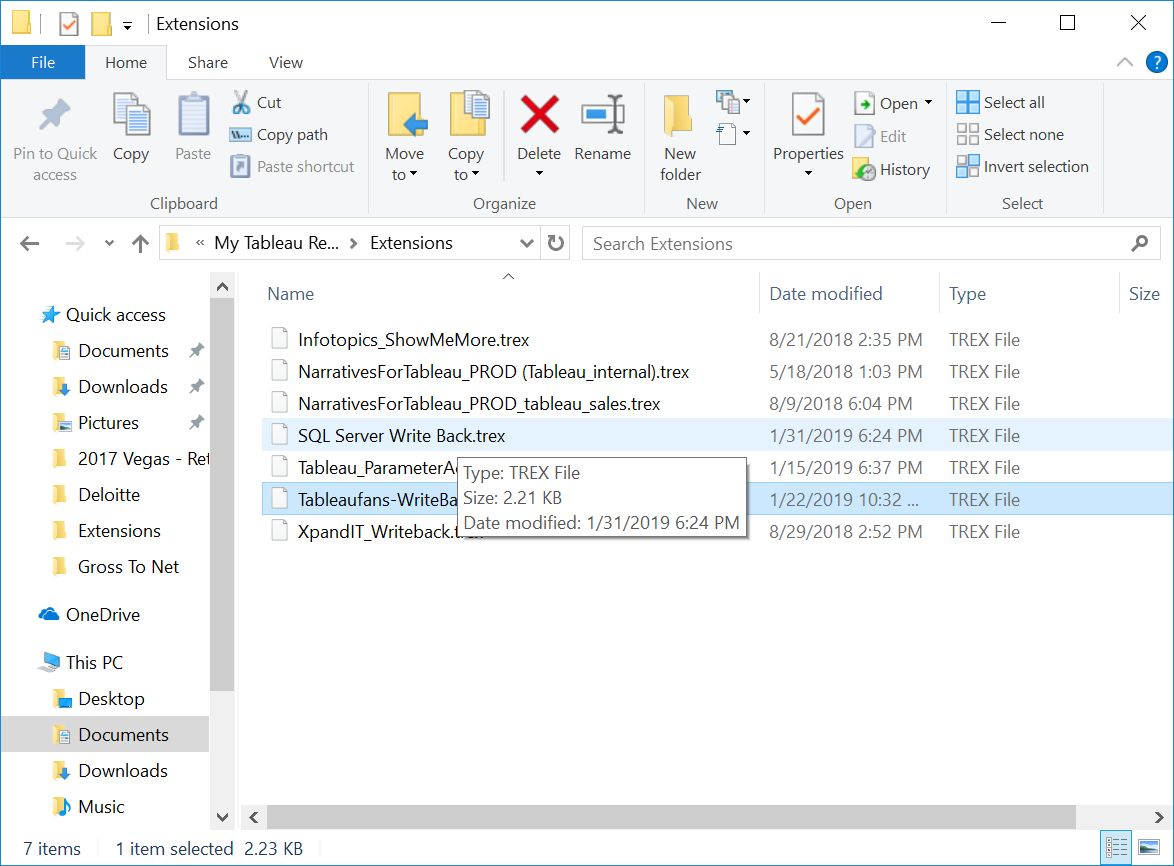
Copy the Entire Directory C:\xampp\htdocs\extensions-api-master\myExtensions\Tableaufans-WriteBack-2018.2 to C:\xampp\htdocs\extensions-api-master\myExtensions\SQL Server

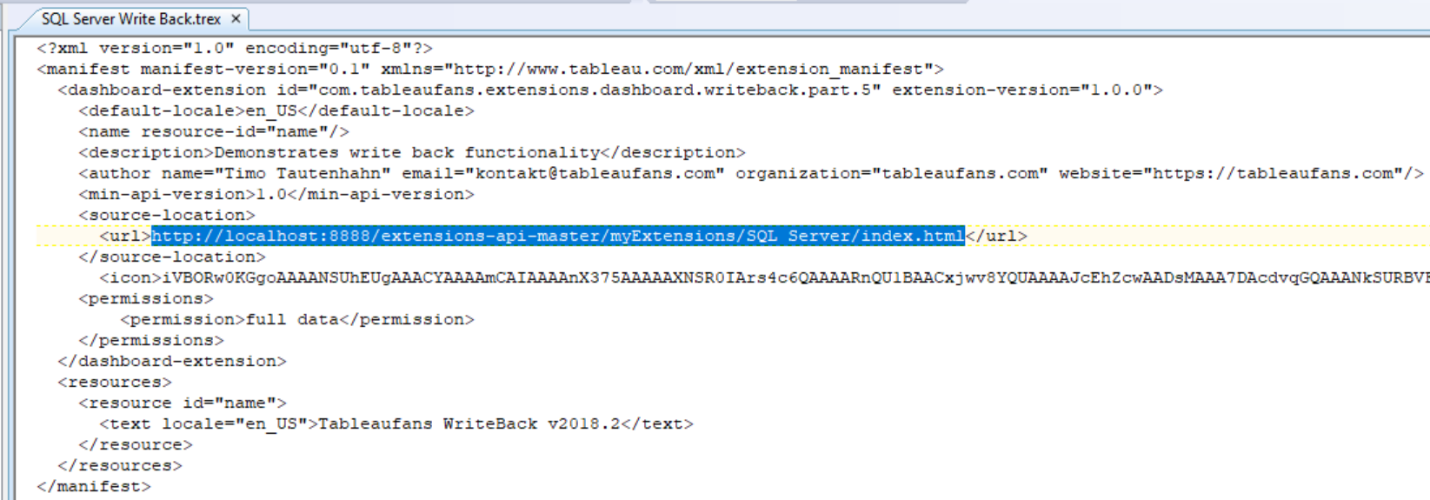
Step 5: Create new TREX file

Copy the Tableaufans-WriteBack-2018.2.trex file in C:\Users\dspezia\Documents\My Tableau Repository\Extensions to the same directory and rename it SQL Server Write Back.  Edit the TREX file to path to the correct write back JS and HTML.  Edit the <URL> Element to:

<url>http://localhost:8888/extensions-api-master/myExtensions/SQL Server/index.html</url>


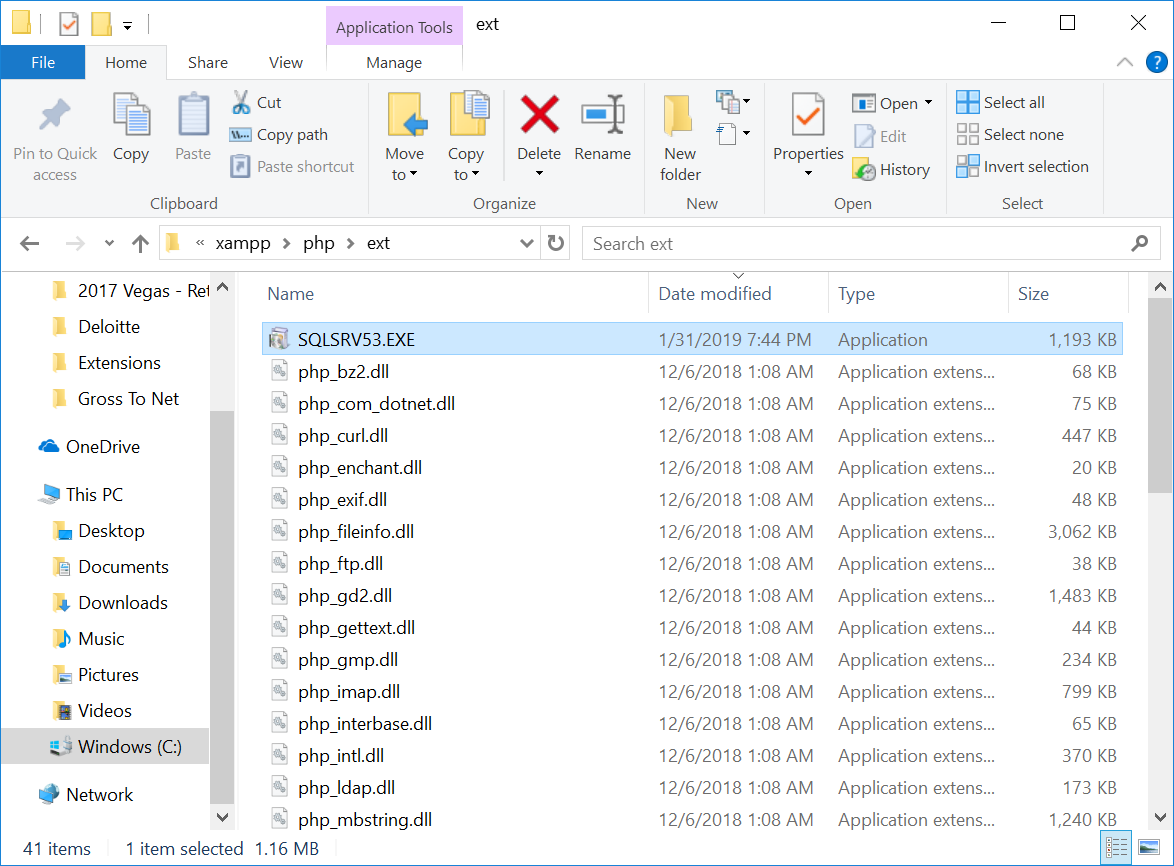
Step 6: Install SQL SVR for PHP

Get the latest SQL Server for PHP 7 drivers from https://docs.microsoft.com/en-us/sql/connect/php/step-1-configure-development-environment-for-php-development?view=sql-server-2017.  Unpack the SQL Server drivers to C:\xampp\php\ext by running the SQLSRV53.EXE.  You only need the php_pdo_sqlsrv_7_ts_x86.dll and php_sqlsrv_7_ts_x86.dll so you can delete the other sqlsrv dlls that were installed.

Step 7: Update the PHP Settings

Update php.ini to point to the new DLLS for SQL Server.  Update php.ini in C:\xampp\php to include the 2 new extensions.  I added them at lines 877 and 878.

extension=php_pdo_sqlsrv_7_ts_x86.dll
extension=php_sqlsrv_7_ts_x86.dll.

If you don’t do it write you will see “PHP Fatal error:  Uncaught Error: Call to undefined function sqlsrv_connect() in C:\\xampp…” in the apache error log in xampp C:\xampp\apache\logs\error.log

Step 8: Update the PHP Code

Update the writeToDb.php code found in C:\xampp\htdocs\extensions-api-master\myExtensions\SQL Server\php.  I set mine up like this:

<?php

$customerName = $_POST['name'];
$clusterName = $_POST['cluster'];
$userInput = $_POST['userinput'];
$checkBox = $_POST['checkbox'];
$selectedMeasure = $_POST['measure'];

$serverName = "localhost";
$options = array( "UID"=>"Tableau", "PWD"=>"Tableau", "Database"=>"Test_Dynamic");
$conn = sqlsrv_connect($serverName, $options);

if( $conn === false )
     {
     echo "Could not connect.\n";
     die( print_r( sqlsrv_errors(), true));
     }

$query = "INSERT INTO [dbo].[tbl_WriteBack] (ColumnName,TextValue) VALUES(?, ?)";
$params1 = array($customerName,$userInput);
$result = sqlsrv_query($conn,$query,$params1);

sqlsrv_close($conn);

?>


Step 9: Update the JS Code

You need to update the refresh code to update the new SQL Server Data Source.  Open the JS file MarksSelection.js in C:\xampp\htdocs\extensions-api-master\myExtensions\SQL Server.  And change the Refresh Section line 467 to 476 to this:

var datasourceName = dashboardDataSources[dataSource.id].name;

                      if (dashboardDataSources[dataSource.id].name == "DatasourceSQL")  {

                             //refreshDataSource(dashboardDataSources[dataSource.id]);

                             //alert("id: " + dashboardDataSources[dataSource.id]);

                             //alert("dataSource.id: " + dataSource.id);

                             refreshDataSource(dashboardDataSources[dataSource.id]);

                             console.log("refreshSQL() was called for Datasource Name: 'DatasourceSQL'");

                      }


                     //refreshDataSource(dashboardDataSources["DatasourceSQL"]);

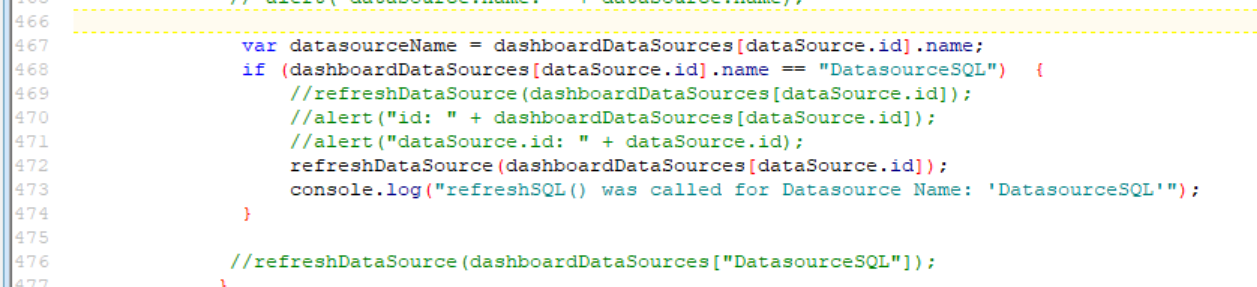
Step 10: Update the TWB

Duplicate the TWB for MySQL Write Back.

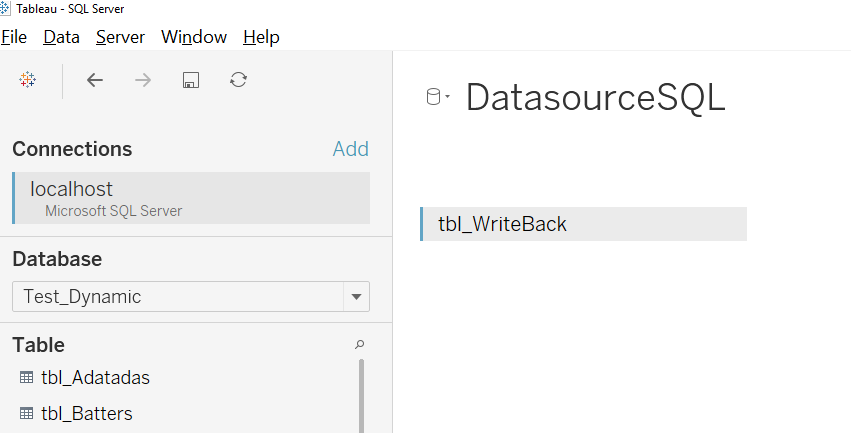
Add a Data Source to the tbl_WriteBack named “DatasourceSQL”

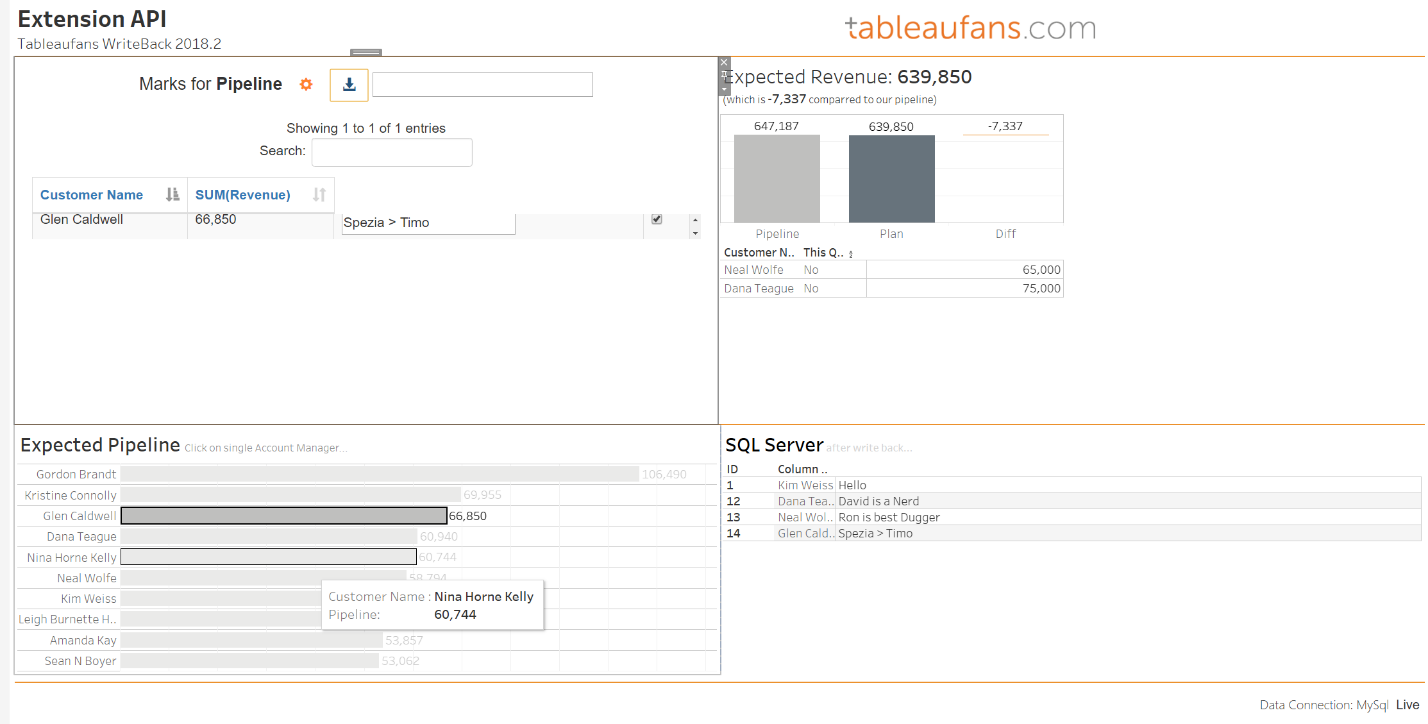
Add a Viz to Display Data from the new WriteBack Table.  Replace the Pipeline after Planning Chart with the new Viz and replace the Old Ext with your new Ext.

Step 11: Have Fun!

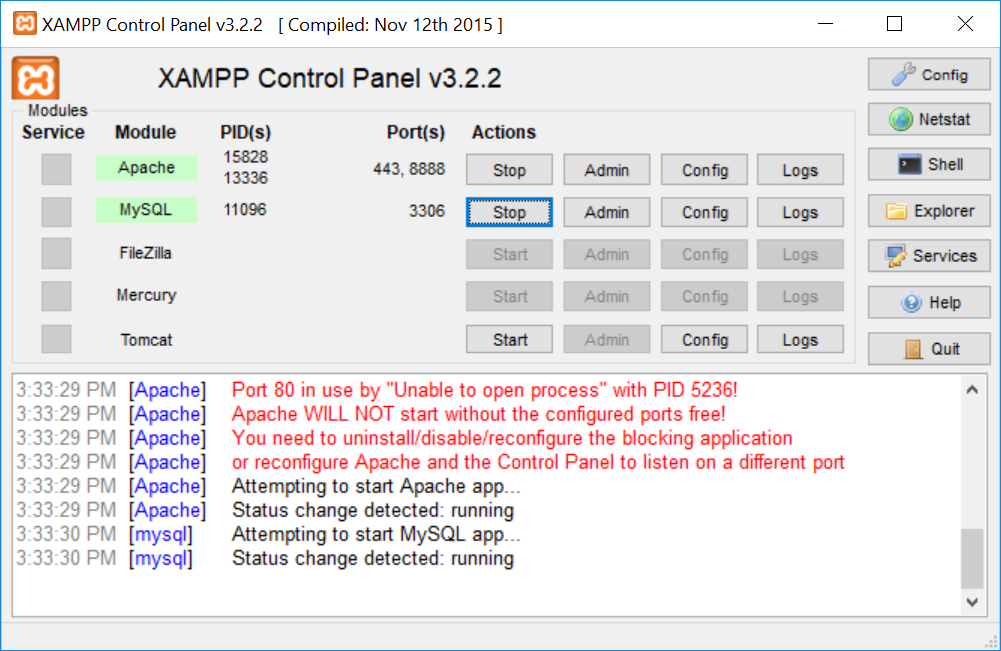
Start your MySQL and Apache Server in XAMPP and have fun!

David Spezia
Über den Autor
David Spezia is an analytics powerhouse with very deep expertise in software architectures, Tableau and big data! Great to have him on board and we're really looking forward to his upcoming posts! Rock on "Uberhengst" ;)

Teilen

  • google-share

10 Kommentare

  1. Avatar
    Christian 22. May 2019 at 8:12 Reply

    Hello, i cannot get it to work. Do you remove the dataconnection to the mysql database and copy the “superstoreeurope” table to the sql server? Or do you still use the mysql to data and then write back to the sql?

    • Avatar
      Diane 19. June 2019 at 18:01 Reply

      Same here.

      • Timo Tautenhahn
        Timo Tautenhahn 4. July 2019 at 8:20 Reply

        Hey Diane,
        please find the comment below

    • Timo Tautenhahn
      Timo Tautenhahn 4. July 2019 at 8:19 Reply

      Hi Christian,
      you leave the MySQL connection as it is and you ADD the MSSQL connection. Within Tableau you call this connection “DatasourceSQL”. On top of this connection you create a simple 3 column table and replace it with the viz on the lower right. After replacing the original WriteBackExtension with the one you’ve been creating in this tutorial you should be able to write data into your newly created viz/table on the lower right.

  2. Avatar
    AJ Fahmy 13. June 2019 at 15:58 Reply

    Hello, great article. My question is: can Tableau write back to Salesforce dashboard? So Tableau gets its data from SAP, then somehow need Tableau to connect and fill Salesforce fields with the data elements out of Tableau. Is this possible?
    Thanks

    • Timo Tautenhahn
      Timo Tautenhahn 4. July 2019 at 8:25 Reply

      Hey AJ,
      thank you very much! Generally speaking this is possible! I’ve been using Tableau URL actions in combination with parameters & dimensions in the past to fill out and submit Salesforce forms. So independent from your exact use case I suggest you to reach out to your Salesforce contact and feel free to get him in touch with me via LinkedIn.

  3. Avatar
    Andrew D 24. September 2019 at 15:15 Reply

    Hi There,

    Got your extension to work fine with both MySQL and MS SQL Server, but when I publish the workbook to a server it works but prompts a print queue each time I click on a new person in the Expected Pipeline section, any reason for this?

    Thanks, Andrew

    • Timo Tautenhahn
      Timo Tautenhahn 26. September 2019 at 9:01 Reply

      Hi Andrew,
      great and yes, that’s my fault! Just delete line 282 where I’m calling the function “print()” instead of console.log().

      Cheers,
      Timo

  4. Avatar
    Szabolcs 4. May 2021 at 13:46 Reply

    Hi Timo,
    I would like to use your write back solution but it is not working on sql server. I completely followed the instructions and run everything similar like with the MySQL but at the end the sql server is not updated. I created database with the same name , the same Tableau user. There are two difference. I use IP address in the writetoDB.php instead localhost and use 64 bit sql server for php. Do you have any idea what I missed? Thanks, Szabolcs

    • Timo Tautenhahn
      Timo Tautenhahn 4. May 2021 at 17:18 Reply

      Hi Szabolcs,
      did you already start to debug the Extension using this approach? https://www.youtube.com/watch?v=1qswvPhd8Yk What is the command line within Chromium logging?

Kommentare Cancel reply

*

*

captcha *

Categories

  • Admin Area (1)
  • Data Stories (1)
  • Developer (2)
  • Embedding API (2)
  • Extension API (12)
  • Geek Stuff (3)
  • Hacks (1)
  • Ideas (8)
  • Industry Related (1)
  • Neuigkeiten (6)
  • News (3)
  • Performance (2)
  • Salesforce (1)
  • SAP (1)
  • Success Stories (1)
  • Tableau 10 (1)
  • Tableau 9 (1)
  • Tableau Server (3)
  • Tableau Visualization Extensions (1)
  • Tipps & Tricks (10)
  • Tips & Tricks (1)
  • Tutorials (14)
  • Visual Inspiration (8)

Tags

artilize Azure bericht Cloud Cloud Database conference Datalake dynamisch embed Embedding Extension API Extract API html javascript api kpi mobile munich news on-demand on-tour parameter RLS Salesforce SAP SAP BW Security Snowflake SSO tc Write Back

Last posts

Tableau Extensibility Framework - More Use Cases

Tuesday, 21. March 2023
Timo Tautenhahn - Tableaufans.com - Tableau Visualization Extensions - Create and share your own chart types - Live Devs on Stage TC21

Tableau Visualization Extensions

Thursday, 11. November 2021

How to configure Tableau Online Single Sign-On with Salesforce as Identity Provider?

Monday, 16. November 2020

Tableau Extensibility Framework

Thursday, 17. September 2020

Embedding Tableau Responsively

Tuesday, 26. May 2020
  • Blog
  • About
  • Contact
  • Legal
© 2019 - tableaufans.com - All rights reserved
Concept and design: www.emodia.de